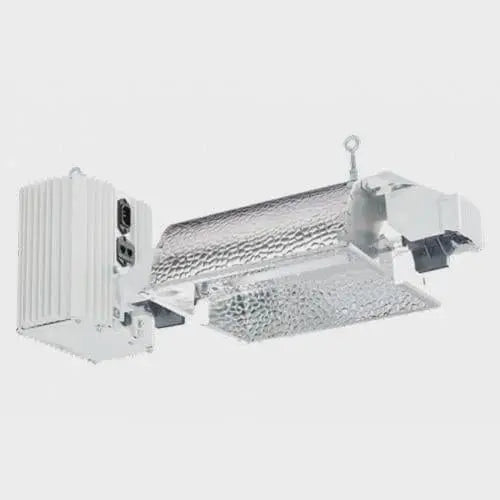
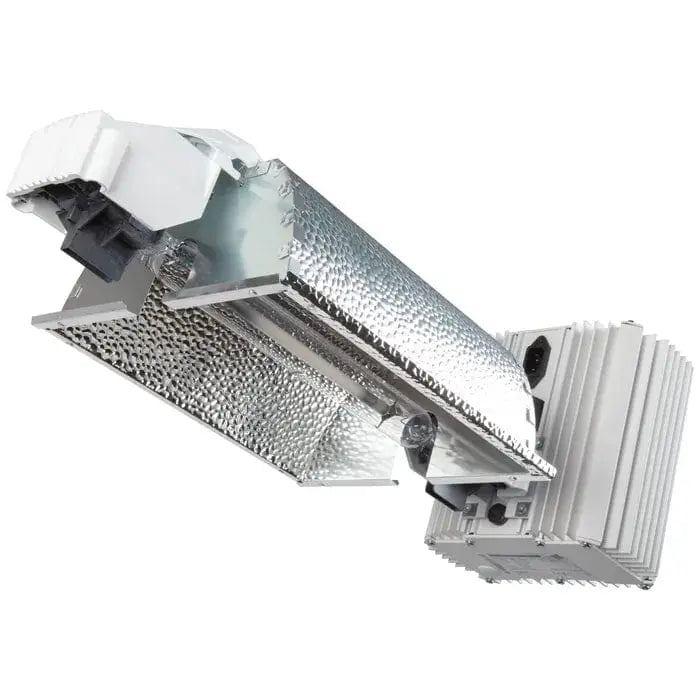


Description
These lights do not come with an onboard dimmer! You'll need either the RS1 or the Gavita Master Controllers to dim/control it!
If you're running multiple slim lines in a room, the easiest way is to grab a single RS1 controller - all cables are in the slimline boxes and no splitters are required (the in and out is on the unit). So to be clear, you just buy the lights and one RS1 per room, and you're good to go!
Dimensions of the Gavita Slimline 1000w: (56.,5x24.5x19.5cm)
The Slimline E series version of the pioneering Gavita Classic, this unit comes with an RJ14 socket and adaptor to allow connectivity to a Gavita Master controller; reducing the need for a timer or contactor whilst offering a wide array of other benefits that come with the Master Controller.
- Low ballast profile, for low ceilings
- 2100 µmol/s PAR output
- 400v High Frequency technology
- 5,000 hrs bulb lifetime
- Variable output: 600W, 660W, 750W, 825W, 1000W, 1150W
- HR96 DE reflector - 95% reflectivity!
- Auto Dim & Auto Shutdown when used with a Master controller
- 3-in-1 complete unit ( Ballast, Bulb & Reflector)
- Soft dim feature
- 3 year warranty
With the addition of either of the Gavita Master Controllers, you can utilise a huge range of features specialising in automation. Dependant on the controller, you can run up to 80 fixtures as well as heaters, fans, co2 equipment etc., you can even set features such as “sunrise & sunset” function. However what we find most exciting is the Auto Dim & Auto Shutdown feature, this will prevent units overheating if there’s a sudden increase in running temperatures and ambient temperatures; protecting both you and your crop.
400v has been utilised for years in the professional horticulture industry as it produces at least 10% more PAR output than conventional 230v systems, Gavita led the way in the 400v revolution by developing a 400v system that runs from a standard 230v socket; bringing you the higher PAR output and cooler running temperatures than what you would see in a standard 100w fixture. Delivering an increase in yield by 10%.
The unique soft dim function allows for this fixture to be run as low as 600w or boosted to a massive 1150w, with each of the 6 steps taking a minute or so to complete. This gradual increase in power prevents shock to you & your bulb and increases life expectancy of the fixture.
Combining the Classic 1000w fixture with the Master Control functionality is a system that is second to none, by producing a complete growing system addressing all environmental variables - automation and crop productivity has never been easier! This complete set up considerably outperforms its competitors.
Pro Tip:
Upgrade to a Wide Angled reflector (W 150 DE) for greater spread and an even better uniformity of light.
It is advised to run the fixture at 100% for 100 hours before dimming or boosting as this allows adequate “burn in” time for the new bulb.
Specifications
- 2100 µmol/s
- 400v technology
- HR96 SE Reflector - 95% reflectivity!
- 5,000 hrs bulb lifetime
- Input Voltage: 240 Volt
- Input Current at 100%: 4.4 Amps
- Input Current at 110%: 6.1 Amps
- Input Power at 100%: 1050 Watt
- Input Power at 110%: 1200 Watt
- Lamp: Gavita Pro Plus 1000 W 400V EL DE HPS K12 x 30S
How to use
Perfectly balanced requiring only two hanging brackets, the 3 in 1 design is ready to use straight out of the box. Simply Remove, hang and plug in. It’s that easy.
Connecting to a Master controller:
- Connect “RJ14 to RJ14” cable (supplied) from ballast to splitter (also supplied)
- Connect “RJ9 to RJ14” cable to Splitter (RJ9 is supplied with Master controller)
- When running more than 1 fixture, a further “RJ14 to RJ14” cable can be used from between splitter and second ballast (up to 80 ballasts can be “daisy chained” in this fashion
- Set dimming knob on ballast to “EXT”
You can now utilise all the benefits of the Master Controller as you are now correctly set up.
When replacing double ended bulbs, ensure the end with the black square is positioned closest to the ballast. Lastly, make sure that you wear gloves to prevent contaminating the new bulb with debris or fingerprints, as this can diminish the integrity of the bulb and lead to bulb failures and at worst, fires.
Recommended footprint: 1.5m (5ft x 5ft)
Hanging distance: Minimum 18 Inches